Your tire blew out, and you sit in the driver seat of your vehicle clutching the steering wheel and asking yourself”What do I do today?”
The good thing is that you prepared beforehand; your spare tire is in great shape, you have everything you need to change the tire, and you also know just what you have to do.
Unfortunately, life isn’t always that neat and tidy. But when it comes to tires, you can always, with a little effort, be ready for the worst. And, though you may have jumped off shifting tires and have vowed to call road service, the truth is that may not always be possible. If you’re along a stretch of street where your cell phone has no support, or you forgot your phone in your home, you will need to use your tire-changing skills! So what can you do to get through this type of crisis?
The very first step is preparation.
Step 1: Prepare For Tire Change
Have you got everything that you need to change a flat tire? That involves more than just the spare tire, which ought to be in good form and with sufficient air pressure. Lastly, if you like to protect your hands, think about having a pair of gloves available.
Find out how to use your jack and lug wrench beforehand — not when you are under the pouring rain at two a.m. trying to figure out which way that management should be turned. Also, you might have to figure out where your spare tire is. If you can not find it, remember that, while some are at the trunk or tucked within a back panel, in bigger vehicles the spare might even be under the car or truck. Your owner’s manual will give you a hint where to search.
Step #2: Get out of how. Next, select a place to change the tire. You should start looking for a stable surface that is not in an uphill or downhill grade. (You do not want your vehicle to roll away from you, would you?) Stay away from parking on grass or dirt, since these unstable regions could allow your carport to sink in the ground.
Keep clear of visitors, where a tumultuous driver might not detect your vehicle across the side of the road. Set up your warning flares or triangles so that additional vehicles may use caution when passing you — this is especially important during the night or when visibility is reduced.
Turn off your vehicle and apply the emergency brake. Ensure that your vehicle won’t roll off while you are changing the tire by placing a stone, brick or wheel chock contrary to the wheels on the opposite side of your vehicle in the flat tire.
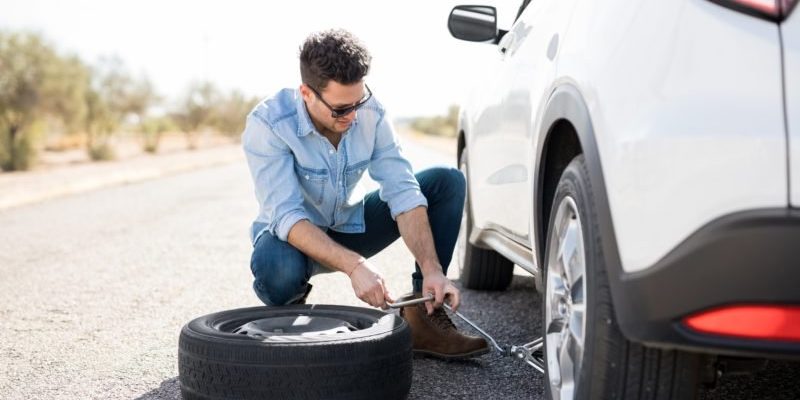
Step #4: Assemble your work items. Fetch the spare tire out of the back. Also take out the jack, lug wrench, screwdriver, and other essential products.
Step #5: Move nuts. Get these lug nuts on your tire loosened to be able to take out the tire. To do that, have a fantastic look at your tire. Does this possess a wheel cover or hubcap? In that case, remove it by using a screwdriver to pry it off. Then use the lug wrench to loosen the nuts by turning each one counterclockwise. Remember, however, you desire those nuts lose but not off. So give them only under one turn each. Are they stuck in place? You might need to use your leg, foot, or entire body weight to get the lug wrench to maneuver, and that is just fine.
Step #6: Lift your infant. Now it is time to get your vehicle into the atmosphere. Put your jack in the best place for lifting. Pay attention to this detail, because lifting your vehicle in the wrong place could harm the vehicle. Frequently the best space is beneath the frame, near the flat tire.
Lift your vehicle at least six inches, or enough to find the flat tire off, but also with sufficient to slip on the fully inflated spare. Don’t be in a hurry to get up it; lift it slowly, turning the grip on the jack clockwise. Make sure no pieces of your body are under the automobile (such as your toes ) at this point and until you lower your vehicle again. Next, you can completely remove the lug nuts and put them in a safe, clean place. You don’t want dirt to get in the threads, so placing them inside the wheel cover or hubcap works nicely.
Step #7: Eliminate the older. Bear in mind that a bicycle is thick, so be ready for the weight. Once it’s off you can roll it on to the trunk of the vehicle where it will not be in the way. Lay it down flat so it does not roll away.
Step #8: Put on the replacement. Take your spare tire and lift it into place, carefully aligning the wheel studs with the holes on the tire. Switch each lug nut clockwise, tightening them as far as you can. Then lower your vehicle by turning the jack handle counterclockwise, and then remove the jack from beneath the car. This is when you’re able to complete tightening the lug nuts with a lug wrench at a crisscross pattern. Do not attempt to tighten the nuts when your car is in the atmosphere since the move could make your vehicle slide off the port. Replace the wheel cover or hubcap if it fits the space. Remember to put all the items you used away from the trunk of your car.
Conclusion:
You remember your spare tire is probably not designed to be used at high speeds or long distances. Get your flat fixed as soon as possible. Additionally, to lessen the need to change your tires under crises, don’t forget to keep a watch on these. Maintain them properly inflated, rotate them frequently, and track them for tread wear.